Price list on Loki Server. Live Update
Wednesday, August 16, 2017
Wednesday, February 22, 2017
Can't update XTRAP through auto patch? Here's a quick and easy way to do it!
Are you having trouble updating XTRAP through the auto patch? Don't worry, you're not alone. Many people have had this problem. But there's a quick and easy way to fix it.
Just follow these steps:
Go to the link below and download the updated XTRAP folder: XTRAP 2293
Once the download is complete, extract the file to your Crossfire client folder.
Launch Crossfire and you should be good to go!
Here's what you'll need:
- A computer with Crossfire installed
- An internet connection
- The ability to follow simple instructions
- Why does this work?
The auto patcher sometimes has problems downloading the latest version of XTRAP. By downloading the file manually and extracting it to your Crossfire client folder, you can ensure that you have the latest version of XTRAP.
I hope this helps!
Here are some additional things to keep in mind:
- Make sure that you download the file from a trusted source.
- If you're still having trouble, you can contact the Crossfire support team for help.
- It's always a good idea to keep your XTRAP up to date. This will help to ensure that you have the latest security patches and that you can play the game without any problems.
Tuesday, February 21, 2017
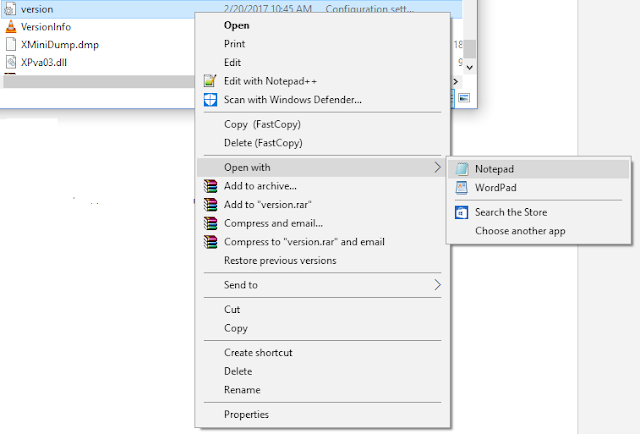
[SOLVED:] Crossfire PH Error: Cannot load the version.ini file
"Hey there, Crossfire players! Are you getting the error message "Cannot load the version.ini file"? Don't worry, I'm here to help. Here's how to fix it:
- Open Windows File Explorer and navigate to the Crossfire folder.
- Right-click on the version.ini file and select "Open with" > "Notepad".
- In Notepad, delete all the contents of the file and replace them with the following text:
[VERSION]
LatestVersion = 1351
MinimalVersion= 1320
OwnVersion = 33
[DOWNLOAD]
server1 = http://download.gameclub.ph/cf/npatch/
[SERVER]
COUNT = 1
IP1 = 125.5.7.154
PORT1 = 13006
[HGW]
PORT = 16666
SERVER1 = 125.5.7.156
POD1 = 34
SERVER2 = 125.5.7.157
POD2 = 33
SERVER3 = 125.5.7.206
POD3 = 33E
4. Save the file and close Notepad.
5. Run CFLauncher.exe. The game should now work!
If you find this post useful, please leave a comment below. Thanks for reading!"
Learn how to disable Cortana in Windows 10's Anniversary Update
Microsoft made windows 10's cortana unkillable in Windows 10 Anniversary update 1607. Users are unable to turn-off cortana if they don't know where to look. Here'a how I disabled it via registry.
1. Open Registry Editor by pressing Windows + R
2. Typing "regedit" into the box and press enter.
3. Navigate to the following key in the left side:
4. If you don't see a "Windows Search" key below the Windows folder, right-click the Windows folder and select New -> Key. Name it "Windows Search"
5. Right-click the "Windows Search" key in the left side and select New -> DWORD (32-bit) Value. Name the value "AllowCortana". Double-click it and set the value to "0" (zero).
6. If you wish to enable cortana in again in the future, set AllowCortana" value to "1".
7, Close the registry editor and restart the computer before the change takes effect.
If Cortana is disabled, the circle icon is replaced by the magnifying lens icon.
1. Open Registry Editor by pressing Windows + R
2. Typing "regedit" into the box and press enter.
3. Navigate to the following key in the left side:
HKEY_LOCAL_MACHINE\SOFTWARE\Policies\Microsoft\Windows\Windows Search.4. If you don't see a "Windows Search" key below the Windows folder, right-click the Windows folder and select New -> Key. Name it "Windows Search"
5. Right-click the "Windows Search" key in the left side and select New -> DWORD (32-bit) Value. Name the value "AllowCortana". Double-click it and set the value to "0" (zero).
6. If you wish to enable cortana in again in the future, set AllowCortana" value to "1".
7, Close the registry editor and restart the computer before the change takes effect.
If Cortana is disabled, the circle icon is replaced by the magnifying lens icon.
Subscribe to:
Comments (Atom)


